This post will be the first of a series, which will cover Google Analytics Filters.
Google Analytics has become a widely used service. The reasons range from it’s being Free, its ease of use, Google’s amazing distribution channel and perhaps also some of the actual product qualities 🙂
There are also quite a few downsides to Google Analytics – which I will cover in a separate post.
So let’s dive into an interesting capability most Google Analytics users are not using, and sometimes not even aware of its existence.
Google Analytics Filters – Lesson #1
Excluding my own traffic from reports
One of the most annoying questions in Web Analytics, is whether our reports are skewed by our own actions. Whether it’s the developer which constantly operates the web site, content managers or in other environments the need to measure traffic which is not from within the organization (especially in large corporates).
There are a few ways around this, but the best way is to find the common denominate of these users I want to exclude, then find a way to exclude it from my reports.
The most popular and widely used way is based on the understanding that organizations with broadband access usually go out of the organization infrastructure using only a few IP addresses or blocks, and that the organization monitors its use of IP addresses.
So, what we want to do, is to find a bunch of IP addresses – then exclude them.
“But how do I find out what my IP is?”
Well, the fastest wayis to use this cool service at http://www.WhatIsMyIP.com – and getting your IP address immediately.
The second step will be to exclude this IP from Google Analytics Reports. So let;s take this step by step:
1. Login to your Google Analytics Account
2. Select the profile you want to work on and click “edit”
3. Go to the third gray box named “Filters Applied to Profile”
4. Click “Add Filter” on the top right
5. Select “Add new Filter for Profile” with the radio button
6. Give the Google Analytics filter a name (example: “exclude my own visits”
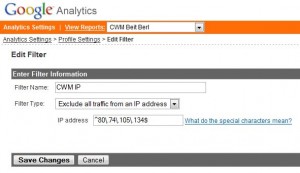
7. Select “Exclude traffic from an IP address”
8. Type in your IP address with a regular expression syntax, so you have to replace “.” with “\.”
So if your IP address is: 123.456.789.012 then you need to type in: 123\.456\.789\.012
You can also use match types and wild cards. Here’s a detailed explanation.
9. Click “finish” and you’re done!
What happens now?
Well – now all the NEW data Google Analytics collects will exclude your IP’s. Make no mistakes – if your IP has visited the web site in the past, it will still show, as Google Analytics Filters only affect the future.
Enjoy!
and two small tips:
1. You can share your filters between profiles in your account – simply select “Apply existing Filter to Profile” in clause 5 and select the existing filters of your choice.
2. Note that when you add more filters to the account, the order of the filters is crutial, and it is highly important to have the first filter first.


Thank you sir for the tutorial. I just recently begun tracking traffic to my site and often wondered how skewed the results were due to my own hovering. Hopefully I’ll be able to find out. Thanks again!